9 Steps To Change Blades On Zero Turn Mower 2024
Just like every machine, zero turn mowers also need maintenance after a while. For those who don’t know how to change blades on a zero turn mower, it is necessary to learn the correct way. As damaged, blunt, and cracked blades of a mower result in a variety of issues that can affect the overall performance while mowing.

It can either lead your mower to vibrate excessively or make improper designs on your lawn, as it’ll take extra effort while mowing. You have to sharpen these blades after your preset interval so that they won’t catch rust making them look bent and faded.
If not maintained then after only a few months, the performance and efficiency will be decreased. So, just when you detect any sign of fading, just sharpen the blades to keep their brand new. In this blog, we’ll be suggesting ways to change the blades of your mower.
Nowadays, most high-ended or commercial zero turn mowers are equipped with a three blades pattern. It’ll help with the performance of the mower by reducing the time of mowing while delivering efficient work. Regardless of the design or the number of blades on your mower, the way of changing them is the same.
How To Change Blades On Zero Turn Mower
1. Preparing The Tools
One of the most essential tasks before even starting with the repair is to gather all the necessary tools to get it done. It’ll make the procedure faster without you running around to find the tools. The tools you may need are;

- Gloves:
The most basic aspect of any repair is maintaining safety. Although your existing blades are comparatively blunt you’ll still have the tendency to cut your fingers or hand if held improperly. Gloves will reduce the risk of injuries and infections. - Box Wrench:
Just look at the size of nuts on your mower and get a wrench exactly that size for easy removal. - Socket wrench and socket:
With some screw box wrenches, it can work but it can’t be used with every nut. For that purpose, the socket wrench should be equipped as per the size required. - New Blades:
It is the reason for the entire mess, so you need to buy new blades for replacing the old ones. Choose the original ones as they’ll help you in the long run and can increase the performance lifespan. - Washers and other spare parts:
You can get an idea from the manual regarding the spare parts, washers, or grease you may need.
Once you’ve gathered all these tools, it’s time to follow the steps accurately to get the best results.
2. Disconnect the Power in your Mower
Before changing the blades right away, you need to get your mower ready. Take it to any flat surface or a leveled floor instead of grass and turn the power off with the ignition key and remove it. Wait till the engine is completely cool, then disengage the spark plug and lift the parking brake of the mower. It’ll make sure that the machine won’t start automatically operating which can result in any damage.
3. Lower the Height & Unscrew
Now, take the deck height of your mower to the least. You can use ⅜ inches wrench for removing the belt covers from the panel, after which you can just remove the bolt by using a ½ inches socket.
4. Loosen up the Bolts and Belts
It’s time to loosen up the spindle pulley belts with the help of a 9/16 inches wrench. It’ll release the tension from the belt that is pulling the arm of this pulley. After that, you can just remove the power take-off clutch and idler pulley belt. The bolts in the idler pulley shouldn’t be removed but only loosened with the help of a 9/16 inches socket. Finally, deattach the cotter and deck pins securing the decks.
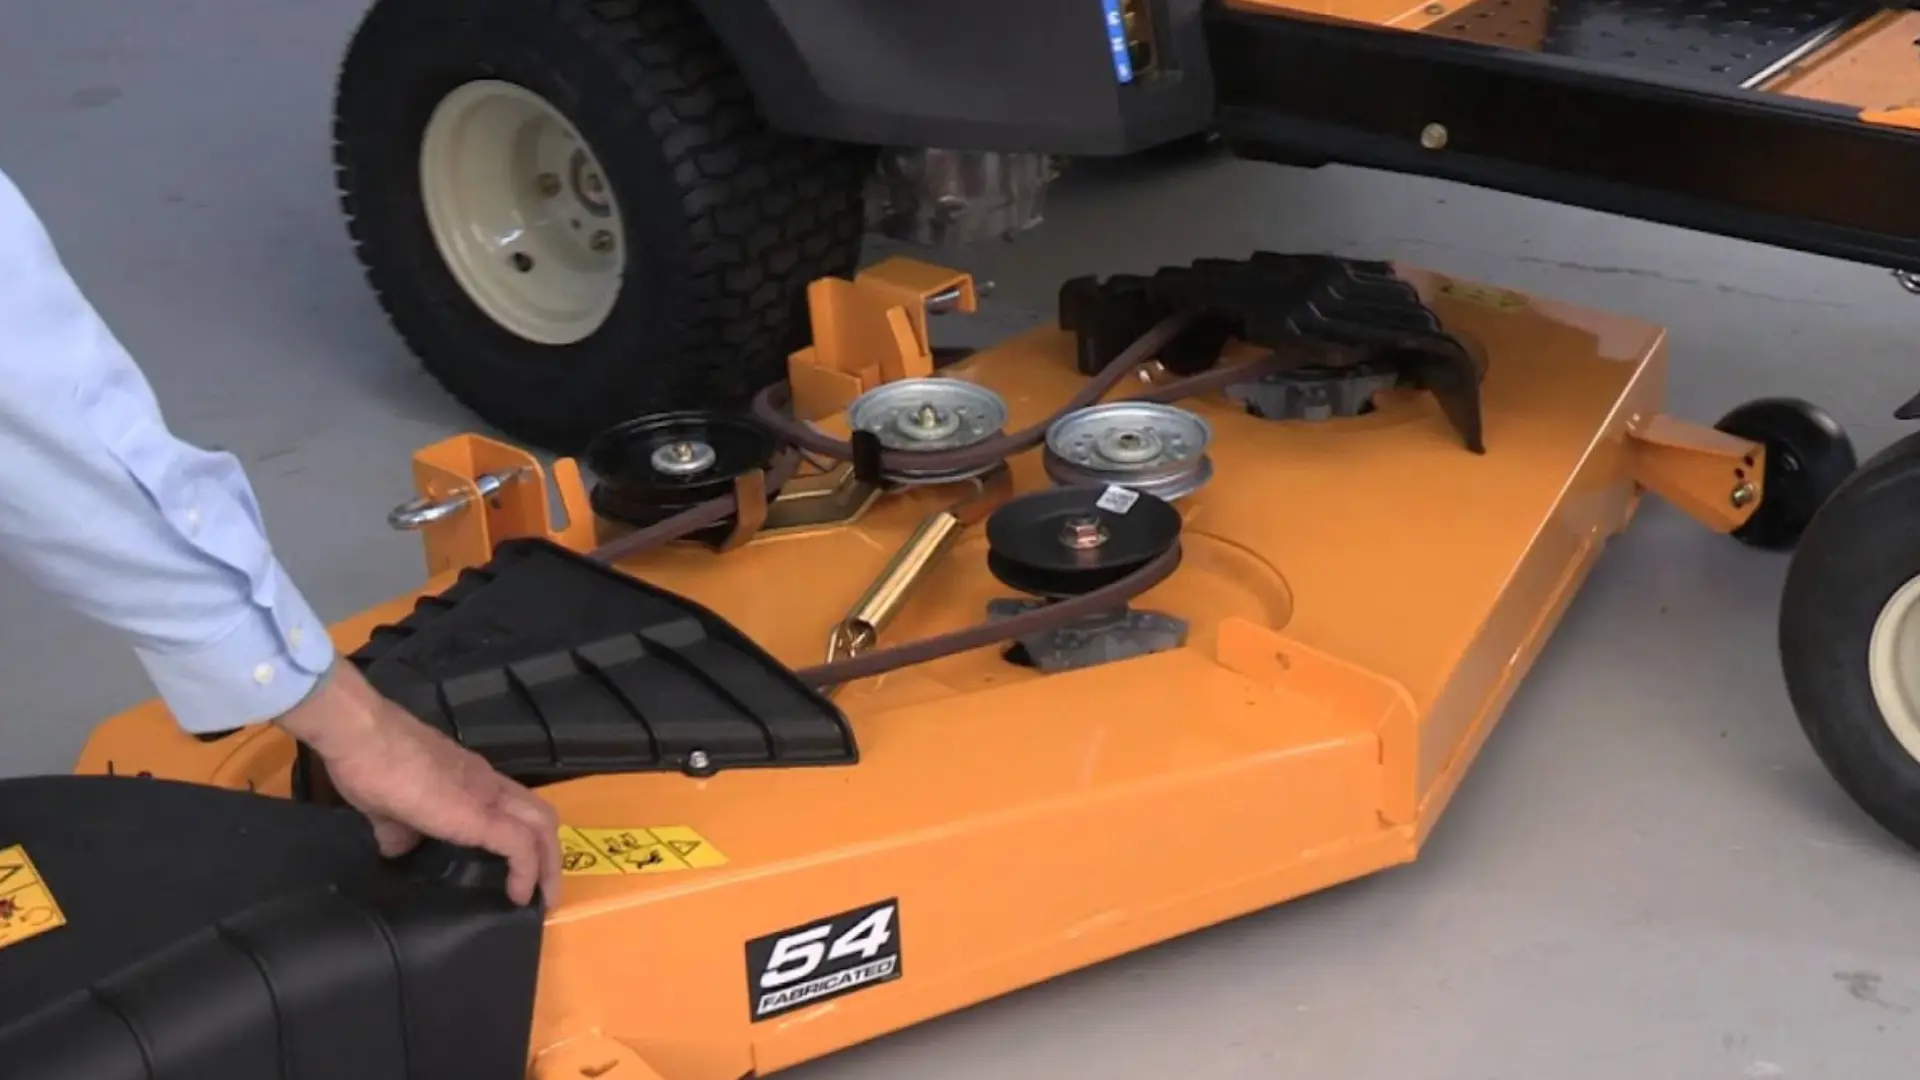
5. Flip the Deck & Remove Blades
Once the pins are removed, the deck can easily slide from the mower. After that, you just have to flip it to change the blade unit. Wear those gloves and take a piece of wood to stop the blade rotation before actually dismantling it. Loosen the nuts of the blades with a 15/16 inches socket wrench as needed.
6. Change the Blades
At last, you can replace the old blades with your new ones and tighten the nuts carefully. It is important to properly install the blade as per the manual to avoid any risk of damage. After proper installation, you’ll see the word “bottom” and blade number facing the floor.
7. Reattach the Deck
Once blades are installed, just follow the steps backward by starting from flipping the deck and sliding it back to its place. Replace the clotter and deck pins to where it belongs.
8. Route Belts

Now it’s time to route all the belts into the correct order as per the manual diagram. Route the belt through idler pulleys and the power take-off clutch. Just use a 9/16 inches socket to tighten the bolts. After then route spindle pulley belts by 9/16 inches wrench that’ll finish the routing session.
9. Reconnect Power
Once every bolt is tightened and every belt is routed then it’s time to reinstall the belt covers and the access panel by attaching the nut. After that, just reconnect the spark plug and lower the parking brake to take your mower to a test drive.
Frequently Asked Questions
Can I change the blades at home?
Yes, due to efficient design, it has become easy for everyone to fix or attach different parts of the mower on their own from blades to levers.
Is disconnecting the power necessary before removing parts?
For safety reasons, it is important to disconnect the power as it can result in you being electrocuted while changing the blades or the machine won’t start by itself.
How often should lawn mower blades be replaced?
This question depends upon your mowing and maintaining requirements. If you want to mow a commercial unit and clean-cut is your utmost demand then you have to change the blades frequently. However, if you only have to mow your quarter-acre lawn then changing them twice a year would be fine.
How do I loosen a zero turn mower blade?
Usually, you just have to carefully turn the blade retaining bolt to the left in a counterclockwise direction. When the holding nut is removed, the blade will loosen up.
Conclusion
Zero turn mowers have become a part of every lawn for quite a long time. However, the designs have been modernized dramatically by the advent of technology. The latest machines of the zero turn mowers have two levers to control the movement. Moreover, there are three blades combined to form a single unit, rather than attached separately like older variants.
The latest changes and technology integration have made mowing a fun hobby for most people. It is necessary to check your blades for changing after every six months or in the starting and mid of the mowing season. Thanks to the handy design, every sort of maintenance can be efficiently done at home with proper guidance.
Most people consider fixing and maintaining the mower at home quite easy not only because of the easy maintenance but because of the cost-effectiveness as well.